How Long It Takes to Install a Sump Pump: A Practical Guide
Learn how long does it take to install a sump pump, plus realistic timelines for DIY vs professional installs, common bottlenecks, and a practical planning checklist for homeowners.

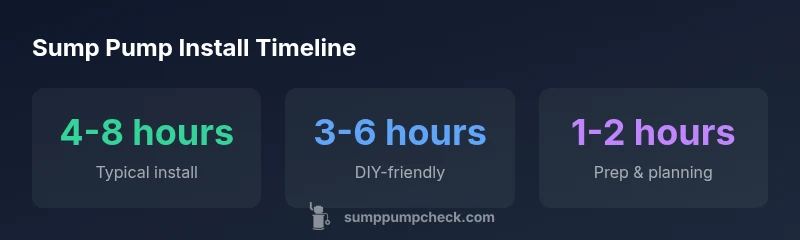
Typically 4-8 hours for a full install, including trenching, pit setup, discharge routing, and wiring. DIY-friendly jobs may finish in 3-6 hours, while professionals often require 4-8 hours depending on basement layout, backup needs, and permit requirements. This assumes a standard single-pump setup in a conventional basement with existing utilities.
Typical installation time ranges
If you’ve ever asked how long does it take to install a sump pump, the answer depends on several variables, from the layout of your basement to existing electrical access. For a standard installation where you’re replacing an old pump with a new unit in a typical basement, most crews estimate 4-8 hours from start to finish. This includes measuring and positioning the pit, installing the discharge line, routing the power supply, and performing initial testing. The Sump Pump Check team emphasizes that times can vary based on whether you’re trenching for a new discharge path or tying into an existing drainage system. The key is to consider all the tasks involved rather than just the pump swap.
What affects installation time
Time to install a sump pump is driven by several factors:
- Pit size and access: A larger, hard-to-reach pit or a tight crawl space adds time.
- Discharge routing: Exterior trenching or re-routing a discharge pipe increases complexity.
- Electrical work: Running a dedicated circuit, GFCI protection, and basement wiring can extend the schedule.
- Backups and accessories: Adding a battery backup, float switch upgrades, or check valve can add 1-2 hours.
- Permits and inspections: Local rules may require approvals that add waiting time.
- Existing plumbing: Adapting to existing drains or replacing piping influences duration. A careful site assessment beforehand helps set realistic expectations and reduces surprises on install day.
DIY vs professional timelines
DIY installations can be shorter if you’re simply replacing a pump in a ready setup and you’re comfortable with basic plumbing and electrical work. Expect 3-6 hours under these favorable conditions, but plan for extra time if you encounter obstacles like wiring reroutes or needing to tear out and replace sections of the discharge line. Professional installs typically fall in the 4-8 hour window because licensed technicians systematically complete all steps, verify code compliance, and perform thorough testing. In cases with complex basements, custom pits, or new trenching, the schedule can extend toward 8-12 hours, or require two days for a meticulous job.
Planning a sump pump install in a finished basement
In finished basements, planning is crucial. You’ll need to identify a location that minimizes visible disruption while ensuring effective drainage. Professionals often map out a path for the discharge line that avoids interfering with foundations, HVAC, or plumbing. If you’re coordinating with a contractor, provide access to a nearby electrical outlet and a clear route to the outside for the discharge. Early decisions about battery backups or automatic float switches can also shave hours off the actual install by reducing later modifications. Sump Pump Check methods suggest creating a simple, written plan with milestones for pit placement, wiring, leak tests, and final commissioning.
Common bottlenecks and how to avoid them
The most common time sink is uncertain site conditions. To avoid delays:
- Confirm permits and utility access before the crew arrives.
- Have power and water shutoffs clearly labeled and ready.
- Prepare the pit area with a clear path for equipment and tools.
- Choose a discharge route early and confirm it won’t hit obstacles like foundation cracks or landscaping. By anticipating these bottlenecks, you can keep the project on schedule and avoid surprise extensions that push the timeline beyond 8 hours.
Scheduling and coordinating your install
An installation day typically begins with a brief site walk-through, followed by pit preparation and conduit installation. If trenching is required, the crew will mark utilities and coordinate with exterior access points. For DIY projects, set aside a full day to account for unexpected delays and ensure you have a helper for heavy lifting and testing. A good practice is to schedule the most time-intensive step—pit setup and discharge routing—early in the day while you still have ample daylight. This approach helps minimize disruption and allows for a thorough post-install test.
Backup pumps, drainage, and permits
If you plan to add a battery backup or a secondary pump, allocate additional time for wiring and testing. Some municipalities require permits for significant drainage modifications or electrical alterations; verify permit requirements with your local building department. In many cases, a straightforward, single-pump replacement with no external trenching can be done within a day. For more intricate work, it’s reasonable to expect 1-2 days of scheduling to accommodate inspections, material delivery, and calibration.
Day-of checklist and site preparation
Before install day:
- Clear the workspace with an unobstructed path to the pit location and discharge area.
- Confirm utility shutoffs and have a grounded power source nearby.
- Gather all components: sump pump, check valve, discharge pipe, couplings, and clamps.
- Prepare a plan for exterior drainage and restore landscaping after completion. On install day, begin with a safety briefing, confirm the pump orientation, and perform a dry-run test to catch misalignments before connecting power.
Comparison of common sump pump installation scenarios
| Scenario | Estimated Time | Difficulty | Notes |
|---|---|---|---|
| Replacing an old sump pump in a standard basement | 4-8 hours | Moderate | Pit and wiring are straightforward |
| Installing a new sump pit with trenching for discharge line | 6-12 hours | High | Exterior trenching adds complexity |
| Adding a battery backup and check valve | 2-6 hours | Low to moderate | Extra wiring and testing required |
FAQ
Do I need a permit to install a sump pump?
Permits vary by location. In many areas, a standard residential sump pump installation does not require a special permit, but electrical or drainage work may trigger reviews. Always check with your local building department before starting.
Permits vary by location. Check with your local building department to confirm whether electrical or drainage work requires approval.
Is professional installation recommended for a finished basement?
Yes. Finished basements often involve more complex discharge routing, electrical considerations, and potential structural implications. A licensed installer ensures code compliance and reduces the risk of future leaks or failures.
Yes. In finished basements, hire a professional to handle electrical and drainage routing safely.
How long does a quick install typically take?
A straightforward replacement in a ready setup can take roughly 4-6 hours. If additional work is needed, such as trenching or upgrades, anticipate longer timelines.
Usually about half a day for a simple replacement; longer if extra work is needed.
What factors commonly increase the installation time?
Factors include trenching length, exterior routing, electrical upgrades, backup system installation, and permit processing. Proper planning can mitigate most delays.
Trenching, wiring, and permits tend to add time; plan ahead.
Can I add a battery backup during installation?
Yes, adding a battery backup adds 1-2 hours depending on wiring complexity and testing. It significantly enhances reliability during power outages.
Yes, you can add a backup battery during installation; it takes a bit more time but is worth it.
What maintenance tasks should I plan after installation?
Regular checks include testing the pump, inspecting the discharge line, and cleaning the sump and float switch. Schedule annual inspections to catch wear early.
Test the pump, inspect the discharge, and clean components yearly.
“A well-planned sump pump install is a day-long project, but meticulous pit placement and proper discharge routing pay off for years. The Sump Pump Check Team emphasizes starting with a clear site assessment and a detailed plan.”
Top Takeaways
- Plan for a full-day project in typical homes.
- DIY-friendly installs can save time but may require more effort.
- Pre-plan discharge routing and electrical access to avoid delays.
- Battery backups add time but improve reliability.
- Check local permit requirements early to prevent hold-ups.