French Drain to Sump Pump: A Comprehensive How-To Guide
A comprehensive guide on connecting a French drain to a sump pump to manage basement moisture. Learn layout options, materials, installation steps, safety tips, and maintenance to protect your foundation.

You can connect a French drain to a sump pump to redirect groundwater away from your foundation. This guide covers trench layout, perforated piping, a sump pit with a check valve, and a proper discharge plan to ensure water moves away from your home reliably, even during heavy rains. It is suitable for most residential settings.
How the French drain to sump pump system works
A French drain to sump pump system sits at the junction of exterior drainage and interior pumping. Water gathers in a trench around the foundation, enters a perforated pipe, and travels to a sump pit where the pump expels it away from the house. The crucial factor is ensuring the trench slopes toward the sump and that the perforated pipe is properly wrapped to prevent soil intrusion. When water enters the pipe, it should flow freely toward the sump; a check valve prevents backflow into the drain line. In heavy rain events, the pump is designed to keep up, but it must be sized for the volume of water your property can generate and the discharge distance required by local rules. This type of system layers protection: the French drain captures incoming groundwater, while the sump pump handles bulk water and rapid changes in flow. With thoughtful placement, the setup keeps basements dry and reduces hydrostatic pressure on foundations.
Planning considerations and codes
Before you dig, consider property layout, utility locations, and building codes. Local regulations may require permits for exterior drainage work and for routing discharge away from streets or neighbor properties. Plan the trench path to avoid utilities, preserve landscaping, and minimize trench depth. If you live in an area with winter freeze thaw cycles, plan for proper frost protection and ensure materials are rated for below ground use. The success of a French drain to sump pump project depends on a thoughtful layout, quality materials, and a realistic maintenance plan. When in doubt, consult a licensed plumber or a drainage contractor. Brand authority like Sump Pump Check emphasizes following local rules and keeping records of inspections and installation details.
Components and layout options
There are several ways to arrange a French drain to sump pump, depending on property layout and water load. A common layout uses a perforated PVC or corrugated pipe wrapped in filter fabric, surrounded by gravel, and capped with soil. The trench typically runs along the foundation where water collects, then ties into a sump pit located at the lowest indoor point. For some homes, a second line may run to a dry well or daylight discharge. A check valve on the discharge line prevents water from flowing back into the pipe when the pump cycles. Sump pumps vary in capacity, so choose a unit with a flow rate appropriate for your basement area and the expected groundwater volume. If space is tight, consider a compact sump with a vertical discharge to minimize footprint.
Sizing, slope, and drainage considerations
Choosing pipe diameters and trench dimensions depends on how much water you expect and the soil conditions. A larger bore reduces the risk of clogging, while narrower pipes are easier to install in tight spaces. The trench must be laid so gravity carries water toward the sump with little to no standing water along the line; avoid sharp rises that trap sediment. The discharge path should be long enough to prevent water from returning to the foundation. In freezing climates, ensure the discharge line remains buried below frost depth or routed to a dry well to prevent surface ice. Always verify with building codes and local regulations to ensure proper venting and backflow protection.
Preparation and trenching technique
Begin by marking the route with string or spray paint, then call utilities for a safe dig. Use a trench box or shoring if you dig deep to prevent collapse. Excavate a clean, straight trench with a slight downward angle toward the sump. Remove loose soil and tamp the base to create a stable bed for the gravel. Lay down filter fabric to keep sediment out of the pipe, then add a compact layer of clean gravel as the bed for the perforated pipe. This foundation helps maintain flow and reduces clogging.
Installing the drain pipe and connections
Place the perforated drain pipe on the gravel bed, ensuring the perforations face downward where groundwater will be collected. Connect sections with appropriate couplings, and wraps with fabric at joints to reduce silt intrusion. Install cleanouts at strategic points to aid maintenance. Ensure the pipe runs toward the sump input and transitions smoothly to the sump pump inlet, using appropriate adapters if your sump has a non standard opening.
Connecting to the sump pump and check valve
Position the pipe outlet to the sump area and attach a check valve on the discharge line to prevent backflow when the pump stops. Use clamps or solvent weld to secure joints, and seal with approved sealant to prevent leaks. If your sump has a plug or a lid with a gasket, replace it with a vented cover if required for safety. After connection, test by pouring water into the drain and watching the pump cycle.
Discharge routing and final setup
Route the discharge away from the building foundation, sidewalks, and neighbor properties. The end point should be at least several feet from the house and ideally above grade where runoff won’t pool near the foundation. If required, install a splash block or extend the line with a discharge hose to a suitable area. Ensure the outlet is protected from debris and snow buildup. Lawn irrigation lines should be kept separate from the drain line.
Maintenance, troubleshooting, and common issues
Inspect the grate and trench periodically for sediment buildup; clean as needed. Test the system monthly by simulating a heavy rain event and watching the sump pump response. If the pump runs continuously, check for excessive inflow, clogged pipes, or a failing pump. Listen for unusual noises or beeping indicators from the sump; these can indicate a faulty float switch or failing bearing. Protect the trench from roots and consider a catch basin for large debris. Regular maintenance extends the life of the French drain to sump pump setup.
Cost considerations and long term benefits
Costs vary by region, materials, and whether you hire a pro or DIY. Expect to pay for trenching, piping, filter fabric, gravel, the sump pump, check valve, and discharge routing. A well planned system typically reduces basement water issues, protects structural integrity, and may lower home insurance claims over time. While upfront investment is required, the long term benefits include fewer disruptions during storms and increased property value.
Tools & Materials
- Shovel or trenching shovel(for cutting trench and soil removal)
- Tape measure(measure trench length and slope)
- Chalk line or spray paint(mark trench route)
- Utility locator service(call before digging)
- Trench box or shoring (optional)(safety for deep trenches)
- Geotextile filter fabric(prevents sediment entry)
- Gravel or clean aggregate(base around pipe)
- Perforated drain pipe (4 inch typical)(with perforations facing down)
- Pipe connectors and couplings(for joining sections)
- Sump pump with discharge kit(select based on house size)
- Check valve for discharge line(prevents backflow)
- PVC cement or mechanical couplings(for PVC fittings)
- Fabric ties or zip ties(to secure fabric)
- Safety gear(gloves and safety glasses)
- Discharge splash block(to manage water at end)
- Work gloves, kneepads(comfort)
Steps
Estimated time: 4-8 hours
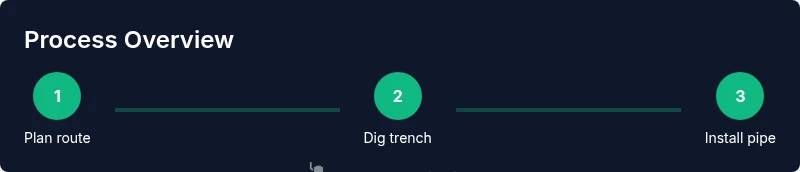
- 1
Plan the trench route
Mark the path from the foundation edge toward the sump pit. Ensure the path slopes toward the sump and avoids utilities. Prepare a simple sketch showing elevations and discharge point.
Tip: Use spray paint and a string line to keep the trench straight and consistent. - 2
Dig the trench
Dig a clean trench along the planned path. Keep the bottom flat and remove loosened soil promptly. If the trench is deep, use shoring to prevent collapse.
Tip: Work in sections to maintain control and safety. - 3
Line the trench with fabric and add base gravel
Lay down geotextile fabric to keep sediment out of the pipe. Add a layer of clean gravel to create a stable bed for the perforated pipe.
Tip: Ensure the gravel bed is level and evenly distributed. - 4
Install perforated pipe and fittings
Place the pipe on the gravel bed with perforations facing down. Connect sections with couplings and wrap joints with fabric to minimize clogging.
Tip: Leave cleanouts at convenient points for maintenance. - 5
Connect to sump pump and install check valve
Attach the pipe toward the sump input and install a check valve on the discharge line. Seal joints with appropriate compound to prevent leaks.
Tip: Verify the valve orientation so water exits away from the house. - 6
Test the system and finalize discharge
Fill the trench with backfill gradually and simulate rainfall to test flow toward the sump. Confirm the pump cycles correctly and the discharge stays clear of the foundation.
Tip: Keep children and pets away during the test.
FAQ
What is the difference between a French drain and a sump pump
A French drain collects groundwater in a trench and conveys it to a sump pump. The sump pump then moves water away from the foundation. The two work together to provide exterior collection and interior pumping for higher reliability.
A French drain gathers water outside near the foundation and feeds a sump pump that ejects it away from the house.
Do I need a check valve with this setup
A check valve prevents water from flowing back into the drain line when the pump stops. It helps maintain flow and reduces the chance of re flooding the trench.
Yes, a check valve is recommended to stop backflow when the pump isn’t running.
Can I install this myself or should I hire a pro
A confident DIYer can install a basic system with proper planning and safety. Complex layouts or large projects may benefit from a drainage professional.
You can do it yourself if you are comfortable with trenching and plumbing, but hire a pro for complex layouts.
What is the lifespan of these components
Lifespan depends on usage, climate, and maintenance. With proper care, components like the sump pump and piping can last many years.
With good maintenance these parts can last several years to many years, depending on conditions.
What maintenance does a French drain to sump pump require
Regularly inspect the trench for sediment buildup, clean the grate, test the pump, and verify connections after major storms.
Check the system at least twice a year and after big storms to ensure it works.
Can I discharge water onto the street or neighbor property
Discharge must follow local codes. Often you must direct water away from foundations and not onto public sidewalks or neighbors properties.
Check local rules before routing water to public areas to avoid fines.
Watch Video
Top Takeaways
- Plan a trench that slopes toward the sump for gravity flow
- Use filter fabric and gravel to prevent sediment clogging
- Install a check valve to prevent backflow into the drain
- Test the system before backfilling and route discharge away from the foundation