Sump Pump Pipe Leak Troubleshooting: Fixes & Prevention
Urgent, practical guide to diagnose and fix a sump pump pipe leak. Learn safety steps, a diagnostic flow, step-by-step repairs, and prevention tips to protect your basement from water damage.

Most sump pump pipe leaks stem from loose fittings, cracked PVC, or a failing check valve. Start by tightening visible clamps and inspecting joints for moisture. If you see water during pumping, shut off power and place a bucket to catch drips; for persistent leaks, plan a deeper inspection or call a pro.
What a sump pump pipe leak looks like and why it happens
Water in the basement near the sump pit is a clear sign something isn’t right. A sump pump pipe leak often shows up as a damp seam along the discharge pipe, weeping at joints, or a small fountain where the line exits the wall. According to Sump Pump Check, homeowners most often notice leaks at fittings and elbows, especially where PVC sections join or transition to metal. In many homes, a slow drip becomes a stream during heavy rainfall or when the pump cycles. Leaks can arise from loose clamps, age cracks in PVC, or a failed check valve that won’t seal. Over time, these leaks waste energy, can back up water into the pit, and invite mold growth. The first sign is moisture around the discharge area; from there, a path of investigation leads to the source.
A leak’s visibility can vary: some leaks are obvious with water spraying from a joint, while others are subtler, dampening the concrete or staining the pipe surface. A rapid pump cycle with a wet footprint is a strong hint that the leak source is in the discharge path rather than the intake. Document any puddles, drips, or damp walls, and note the weather conditions when the leak appears most—heavy rain or rapid snowmelt often stresses the system most.
Understanding where water is escaping helps you separate the symptoms (condensation, high humidity, or splashback) from the true leak. For homeowners, the goal is to locate the leak’s source quickly to minimize flood risk and protect basement finishes. Early detection also reduces energy waste and prolongs the life of the sump pump. The best practice is to inspect after a pumping cycle and during a rain event for a realistic view of how the system behaves under stress.
titleContentIgnoredForSEO
Steps
Estimated time: 60-120 minutes
- 1
Power down and secure the area
Unplug the sump pump and shut off the circuit breaker for the dedicated sump pump circuit. Remove any standing water and dry the area to prevent slips. This protects you while you inspect fittings and joints.
Tip: Always work with dry hands and dry flooring to avoid shocks. - 2
Inspect visible joints and clamps
Start at the pump outlet and follow the discharge pipe to the exterior. Look for wet spots at every joint, clamp looseness, or misaligned elbows. Tighten clamps carefully and note any joints that show moisture.
Tip: Use a flashlight and a mirror to inspect hard-to-see joints. - 3
Test the check valve operation
Locate the check valve and test its operation by lifting the valve to ensure it seals when released. If it feels stiff or leaks, plan for valve replacement. A faulty valve is a common source of recurring leaks.
Tip: Replace with a modern, corrosion-resistant valve if needed. - 4
Assess the exterior discharge and slope
Check the exterior run for cracks, exposed pipe, or crushed sections. Ensure the pipe slopes away from the foundation at about 0.25 inches per foot to prevent pooling near the wall.
Tip: If you must adequacy-test, pour a small amount of water and observe flow. - 5
Address small fixes and reseal joints
Apply appropriate solvent cement to joints or reseal with gasket material where needed. If the pipe shows minor scratches, small patches of epoxy putty can be used as a temporary seal until a permanent fix is possible.
Tip: Avoid over-application; excess cement can squeeze into the pipe and cause blockages. - 6
Replace damaged sections when necessary
For cracked pipes or severely corroded fittings, cut out the damaged portion and install a new PVC segment with proper cement, clamps, and primer. Allow adequate cure time before testing.
Tip: Measure twice, cut once to minimize waste. - 7
Test the system and monitor
Reconnect power and run the pump. Observe all joints and sections for leaks for several cycles. Keep a bucket or towels handy in case of residual drips.
Tip: Document the test with photos for reference. - 8
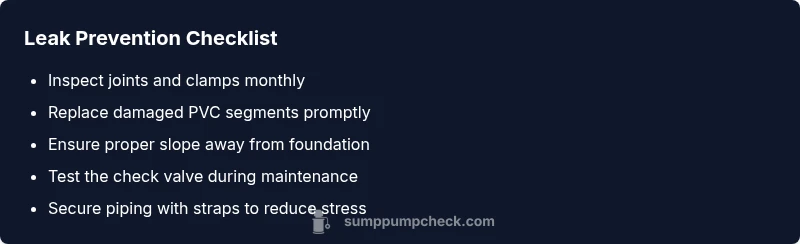
Plan maintenance and schedule follow-up
Create a maintenance calendar to inspect joints and check valve quarterly and after heavy rainstorms. Replace aging components to prevent future leaks, and keep spare clamps and PVC segments on hand.
Tip: Set reminders on your phone or calendar.
Diagnosis: Water dripping or pooling near the sump discharge pipe, especially after rainfall or during pump operation.
Possible Causes
- highLoose or damaged fittings
- highCracked PVC pipe or elbow joints
- mediumFailed check valve not sealing
- lowImproper slope causing pooling
- lowCorrosion or damage at metal transitions
Fixes
- easyTighten clamps and fittings; replace any cracked joints
- mediumReplace cracked PVC segments and re-glue joints with fresh cement
- easyReplace the check valve and verify it seals when the pump stops
- mediumRe-route or re-slope the discharge pipe to ensure proper gradient
- mediumReplace damaged metal transitions or corroded fittings and secure with straps
FAQ
What are the most common causes of a sump pump pipe leak?
Loose fittings, cracked pipes, and a failing check valve are the most frequent culprits. Improper slope and aging sections can also contribute. Inspect joints, elbows, and the discharge path to identify the exact source.
Common causes are loose joints, cracked pipe, and a faulty check valve.
Can I fix a sump pump pipe leak myself, or do I need a professional?
Many leaks can be addressed with basic tools: tightening clamps, replacing small pipe sections, and resealing joints. Complex issues or high-pressure leaks may require a plumber or sump-pump technician for safe repair.
You can often fix simple leaks yourself, but call a pro for complex ones.
How do I tell if the leak is active or just condensation?
An active leak shows water during pumping, while condensation typically appears as dampness due to temperature changes. Look for water movement and dripping in pump cycles to differentiate.
If water appears during pumping, it’s likely an active leak, not just condensation.
How often should I inspect sump pump discharge piping?
Inspect quarterly and after heavy rain or spring thaw. Check fittings, slope, valve function, and exposed pipe for cracks or corrosion.
Check it a few times a year and after big storms.
What safety steps should I take if water pools near an electrical outlet?
Do not touch water near outlets. Shut off the circuit breaker, unplug the pump, and call a licensed electrician if needed. Keep pets and children away until cleared.
Shut off power and stay away from water near outlets.
Should I replace the entire sump-pump system because of a leak?
Not necessarily. Start with fixing the leak and replacing damaged components. If the pump is old or frequently failing, a replacement might be more cost-effective in the long term.
Often, fixing the leak is enough, but consider replacement if the pump is aging.
Watch Video
Top Takeaways
- Inspect the discharge path for obvious leaks first
- Tighten fittings and replace damaged sections promptly
- Check valve operation to prevent future leaks
- Test after fixes and maintain a quarterly inspection routine